Pages

Saturday, 21 February 2015

How to Highlight and Unhighlight an Element Using Selenium Web Driver?

Highlighting an element in the web page during execution may assists the tester to recognize the correct element execution in the project during automation process.

Here we will see how an element is highlighted before and after clicking on the particular element and taking the screenshots with the highlighted element. We will use the JavascriptExecutor interface to implement functionality in Selenium Web Driver.

Create a Class say element_Highlight as below:

package Your_Package_Name;

import org.openqa.selenium.JavascriptExecutor;
import org.openqa.selenium.WebDriver;
import org.openqa.selenium.WebElement;

public class element_Highlight {
 public void highlightElement(WebDriver driver,WebElement element) {  
  JavascriptExecutor js=(JavascriptExecutor) driver;
  js.executeScript("arguments[0].style.border='3px solid red'", element);
 }

 public void unhighlightLast(WebDriver driver,WebElement element) { 
  JavascriptExecutor js=(JavascriptExecutor) driver;
  js.executeScript("arguments[0].style.border='0px'", element);
 }
}

Now, call the highlightElement(Browser Object, element) method in your statement block of code as below:

public class Test2
{
final WebDriver driver;
element_Highlight eh= new element_Highlight();
public void EnterName(String username) { 
      rd.writereport(0, 1, username);
      WebElement e1=driver.findElement(By.xpath(c.getElementName("name")));
      eh.highlightElement(driver, e1);
      e1.sendKeys(username);
      eh.unhighlightLast(driver, e1); 
}


Many Thanks for your valuable comments and suggestions in advance.

Sunday, 1 February 2015

How to Automate Browser's Authentication Pop Up in Selenium Web Driver using AutoIt

Selenium Web Driver support only web application testing.So, window's popup can not be handled using Selenium.

Here I will use AutoIt scripting  tool to automate the Window's Authentication Popup.

Follow the Steps mentioned as below:

  1. Download and Install AutoIt Scripting tool
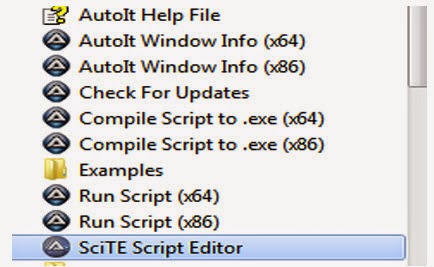
  2. Open text Editor (SciTE Script editor) 


3. Write the Code in the Text Editor as bellow:

AutoItSetOption("WinTitleMatchMode","2") 
WinWait("Authentication Required") 
$title = WinGetTitle("Authentication Required") ; retrives whole window title 
$UN=WinGetText($title,"User Name:")
ControlSend($title,"",$UN,"Username");Sets Username
Sleep(2000);
$PWD=WinGetText($title,"Password:") 
Send("{TAB 1}")
Sleep(2000);
ControlSend($title,"",$PWD,"password");Sets PWD 
Send("{ENTER}")

The Script will be saved with .au3 extension.

4. Now, convert the .au3 file in executable using Compile Script to .exe tool. The Script is ready to use with the selense command.


Place the authentication Script(autoit script ) under the Project folder and set the path in Object.Property File(How to set all the locators in the Object Property file).
Initialize the New Process using below Code:
static Process p = null;
p=Runtime.getRuntime().exec(c.getElementName("Auth_path"));
p.destroy();

Where "auth_path"  is the element name defined in the Object repository file and destroy the process at the end of the program execution. 


Friday, 16 January 2015

Taking screenshots on test failure in testNG + Selenium Web driver.

Taking screenshot on test failure is very important part of the test execution process especially when you are executing large number of test cases.

Follow the below mentioned steps to take the advantages of this feature :
  1. Use TestNG 
  2. Create Your own listener and override the methods of TestListener adapter class 
Create a new listener class as below:
package Your_package_name;
import java.io.File;
import java.io.IOException;

import org.apache.commons.io.FileUtils;
import org.openqa.selenium.OutputType;
import org.openqa.selenium.TakesScreenshot;
import org.openqa.selenium.WebDriver;
import org.testng.ITestResult;
import org.testng.Reporter;
import org.testng.TestListenerAdapter;

public class ScreenShotOnFailure extends TestListenerAdapter {
 @Override
 public void onTestFailure(ITestResult result) {
  WebDriver driver = WebDriverManager.getDriverInstance();
  if(driver!=null){
   System.out.println("Snapshot for: " + result.getMethod().getMethodName());
  File file=new File("Screenshot_File");
  if(!result.isSuccess()){
   File scrFile = ((TakesScreenshot)driver).getScreenshotAs(OutputType.FILE);
       //Needs Commons IO library
       try {
         FileUtils.copyFile(scrFile, new File(file.getAbsolutePath()+ "/screenshot/shot_" + result.getMethod().getMethodName()  + "()" + ".jpg")); 
         } 
       catch (IOException e) {
         // TODO Auto-generated catch block
         e.printStackTrace();
     }
     Reporter.setCurrentTestResult(result);
     }
  }
  }
 }


By using ScreenShotOnFailure class, it will override the onTestFailure method of TestListenerAdapter Class when exception is thrown.

Now call the listener in the testng.xml file as below:

<listeners  useDefaultListeners="false">
       <listener class-name="org.testng.reporters.TestHTMLReporter" />  
       <listener class-name="org.testng.reporters.JUnitXMLReporter" />
       <listener class-name="org.testng.reporters.XMLReporter" />
       <listener class-name="package_name.ScreenShotOnFailure"/>    
</listeners>


Use @listeners annotation to call the ScreenShotOnFailure listener class as below:

package package_name;
import org.openqa.selenium.WebDriver;
import org.openqa.selenium.support.PageFactory;
import org.testng.TestListenerAdapter;
import org.testng.annotations.AfterClass;
import org.testng.annotations.BeforeClass;
import org.testng.annotations.Listeners;
import org.testng.annotations.Test;
@Listeners(ScreenShotOnFailure.class)
public class TestDR extends TestListenerAdapter { 
  ReadXclData RD= new ReadXclData();
  ComProFile c = new ComProFile ();
 @BeforeClass
 public void setUp() throws Exception {
  WebDriverManager.startDriver(); 
 }
Now run your script and you will get the screenshots in screenshot folder as below:


Read previous post How to set all the locators in the Object Property file in Java

Thursday, 15 January 2015

How to set all the locators in the Object Property file in Java

Why we need to do this?

It seems easy to code or make a project automated in the Selenium Web Driver, but more difficult to manage or maintain, especially when its larger in size and if someone else want to modify it in your absence(if any modification is required)*. 
He or she can understand this in a better way and gets all the required locators, link path etc at a single place.